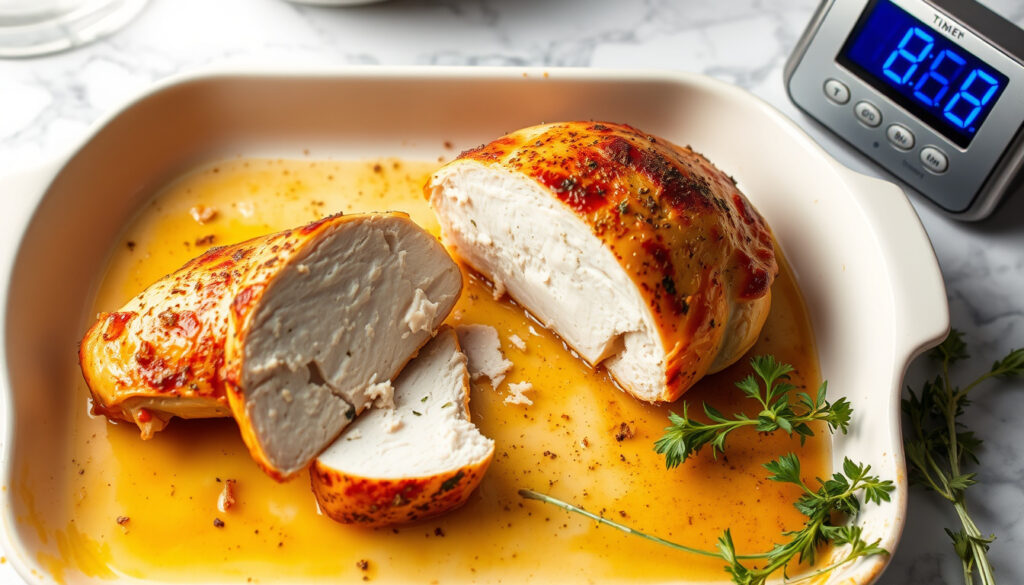
How Long to Bake Chicken Breast – Exact Times for Juicy Results
Getting the timing right when you bake chicken breast means the difference between tender, juicy meat and something that tastes like cardboard. Most recipes give vague estimates, but the exact time depends heavily on oven temperature, the thickness of your chicken, and whether it came straight from the freezer or the refrigerator. This guide breaks down precise baking times for every common scenario, backed by food safety standards and tested cooking methods.
Whether you are planning a weeknight dinner or prepping ingredients for the week ahead, understanding how temperature and time work together helps you hit that perfect 165°F internal mark every time. The USDA recommends 165°F as the safe minimum temperature for all poultry, measured at the thickest point away from bone.
How Long to Bake Chicken Breast at 350°F?
Baking chicken breast at 350°F represents the traditional approach most home cooks learned first. This lower temperature provides gentle, even heat that works well for larger cuts and whole birds. For boneless, skinless breasts weighing 4 to 8 ounces, expect 20 to 30 minutes at this temperature.
20-30 min for standard breasts
15-25 min for faster results
165°F internal temp required
Always use a meat thermometer
Boneless vs. Bone-In Timing
Bone-in chicken breasts require additional time because the bone conducts heat differently and slows the cooking process. Plan for 10 to 15 minutes extra when baking bone-in pieces at the same temperature. Thighs and drumsticks follow their own timeline, with boneless thighs needing 35 to 40 minutes at 350°F compared to 45 to 50 minutes for bone-in legs.
Adjusting for Thickness
Thickness matters more than weight when calculating bake time. A 1-inch thick breast cooks faster than a 1.5-inch piece at the same temperature. Thicker cuts weighing 12 ounces or more typically need an extra 5 to 10 minutes regardless of oven setting. Pounding chicken to an even ½ to 1-inch thickness helps ensure uniform cooking.
- Always verify internal temperature with a probe thermometer rather than relying on timing alone
- Thicker pieces need more time; thinner pieces cook faster and risk drying out
- Oven calibration varies—check your specific appliance for accuracy
- Starting temperature matters; refrigerated chicken takes longer than room-temperature pieces
- Carryover cooking raises internal temperature 5-10°F after removal from the oven
- Resting time of 5 minutes allows juices to redistribute throughout the meat
| Oven Temp | Boneless Skinless (4-8 oz) | Bone-In Breasts | Boneless Thighs | Drumsticks |
|---|---|---|---|---|
| 350°F | 20-30 min | +10-15 min extra | 35-40 min | 45-50 min |
| 375°F | 20-30 min (ideal for 8 oz) | 40-55 min | 30-35 min | 40-45 min |
| 400°F | 15-25 min (18 min for 8 oz+) | Similar to boneless + extra | 25-30 min | 35-40 min |
| 425°F | 12-15 min | N/A | 20-25 min | 30-35 min |
| 450°F | 10-12 min (20 min for juicy 8 oz) | N/A | 15-20 min | 25-30 min |
Times assume thawed chicken placed on a greased baking sheet. Checking the internal temperature early and often prevents overcooking, which remains the most common mistake home cooks make with baked chicken.
How Long to Bake Chicken Breast at 400°F for Juicier Results?
Higher oven temperatures like 400°F offer distinct advantages for chicken breast. The intense heat causes proteins in the meat surface to seize quickly, trapping moisture inside before the center finishes cooking. This approach produces juicier results compared to prolonged low-temperature baking, which slowly draws out moisture.
Faster Cooking Benefits
At 400°F, boneless skinless breasts typically finish in 15 to 25 minutes. The exact time depends on thickness, but the shorter overall cooking window means less opportunity for the meat to dry out. Many cooks prefer this method specifically because it delivers more favorable texture alongside proper doneness.
For 8-ounce breasts at 400°F, plan for approximately 18 minutes. Smaller 4-ounce portions may be done in as little as 12 to 15 minutes. Always check early when trying a new thickness or starting temperature.
Frozen Chicken Adjustments
Baking frozen chicken breast without thawing requires roughly 50% additional time. At 400°F, this means checking for doneness around 25 to 35 minutes instead of the standard 15 to 25 minutes. However, the FDA advises thawing poultry safely in the refrigerator when possible, as this produces more consistent results and reduces cooking time significantly.
How to Know When Chicken Breast is Done Baking?
The only reliable method for determining doneness involves using a meat thermometer. Visual and tactile cues cannot guarantee food safety the way precise temperature measurement can. Insert the probe into the thickest part of the breast, avoiding any bone, and read the temperature once it stabilizes.
Internal Temperature Guide
The USDA food safety guidelines establish 165°F as the minimum safe temperature for chicken breast. However, many cooking experts recommend pulling the chicken at 160°F and allowing carryover cooking to finish the job, since the temperature will continue rising 5 to 10 degrees during the resting period. This approach often yields more tender results than cooking to the full 165°F.
Insert the probe horizontally into the center of the thickest portion. For bone-in pieces, measure at least ½ inch away from the bone to get an accurate reading of the meat temperature rather than heat conducted through the bone.
Visual and Texture Checks
While not definitive, certain signs accompany properly cooked chicken. The juices should run clear rather than pink when you cut into the meat near the bone. The flesh should appear opaque throughout rather than translucent. Pressing gently with tongs reveals firm, resilient texture rather than soft or spongy consistency. Still, these methods cannot replace thermometer verification.
Baking Variations: Frozen, Bone-In, and More
Different starting conditions require different approaches. Understanding how frozen state, bone presence, and thickness affect cooking helps you adapt the standard guidelines to your specific situation. For juicy results, consult this guide on how to bake chicken breast at Köttfärslimpa grader tid.
Frozen Without Thawing
Cooking directly from frozen works but demands patience and careful monitoring. Add approximately 50% to the normal cooking time, then verify with a thermometer rather than relying on timing alone. At 350°F, frozen boneless breasts may require 30 to 45 minutes before reaching safe temperature. The exterior may begin to look done while the center remains frozen, making temperature checking essential.
Never leave chicken at room temperature to thaw for more than two hours. The refrigerator method remains the safest approach, typically requiring 24 hours for a standard pack of breasts. Microwave thawing works for immediate cooking but can create uneven results.
Thickness and Poundage
Uneven thickness causes the thin ends to dry out before the thick center reaches safe temperature. Pounding chicken to an even ½ to 1-inch thickness solves this problem and creates more predictable results. A meat mallet or rolling pin works well for this task. Consider splitting thicker breasts horizontally to create two thinner cutlets if your pieces exceed 1.5 inches. For those who buy chicken in bulk, checking local flyers for chicken deals can help stock your freezer with economical portions.
The Baking Process: Step by Step
- Preparation (5 minutes): Preheat your oven to the chosen temperature. Remove chicken from packaging, pat dry with paper towels, and season as desired. Lightly oil the baking surface or use parchment paper.
- Pounding (optional, 3-5 minutes): Place chicken between two sheets of plastic wrap or in a sealed bag. Pound gently to even thickness using a meat mallet or rolling pin.
- Temperature check before baking: Insert your thermometer into the thickest part to establish a baseline. This helps estimate remaining cooking time.
- Baking: Place chicken in the preheated oven on the center rack. Position breasts at least 1 inch apart for even air circulation.
- Mid-cooking verification (at estimated 60% time): Begin checking temperature around the halfway point, especially for thicker pieces or when cooking from frozen.
- Resting period (5 minutes): Remove chicken when the thermometer reads 160°F. Cover loosely with foil and let rest 5 minutes before slicing.
What We Know for Certain vs. What Varies
Some aspects of baking chicken breast remain consistent regardless of circumstances, while others depend heavily on individual factors.
| Established Information | Variables That Affect Timing |
|---|---|
| Safe minimum internal temperature: 165°F | Oven calibration accuracy |
| Higher heat (400-450°F) yields juicier breast | Starting temperature of chicken |
| Bone-in pieces need 10-15 min longer | Exact thickness of each piece |
| Frozen adds roughly 50% more time | Number of pieces in the oven |
| Resting redistributes juices | Material of baking pan |
Why Temperature and Time Matter Together
Temperature and time function as interconnected variables rather than independent factors. A thicker breast at 350°F might take 35 minutes to reach safe temperature, while the same thickness at 400°F finishes in 22 minutes. Conversely, a very thin piece might overcook and dry out at high temperatures despite shorter timing. Finding the right combination involves balancing heat level, thickness, and desired texture.
Low-and-slow methods work better for tougher cuts like whole chickens or dark meat, where extended time breaks down collagen. Boneless chicken breast lacks this connective tissue, making higher temperatures and shorter times more appropriate. The lean muscle fibers in breast meat tighten and squeeze out moisture when overcooked, which is why temperature monitoring proves critical.
The USDA recommends 165°F as the safe minimum internal temperature for all poultry products, including chicken breast. This standard applies regardless of cooking method or starting temperature.
Expert Guidance on Achieving Perfect Results
Professional cooks and food safety experts emphasize several practices that consistently produce better baked chicken. Using a quality instant-read thermometer removes guesswork entirely. Brining or marinating chicken for 30 minutes to 24 hours before baking improves moisture retention. Patting chicken completely dry before seasoning prevents steaming. Lightly coating with oil promotes browning and creates a barrier against moisture loss.
For those seeking convenient meal options, various delivery services offer quality chicken alongside other ingredients. The No Frills Flyer for Chicken Deals helps locate current sales on poultry products. Similarly, Uber Eats for Easy Meals provides access to prepared chicken dishes when cooking time is limited.
Summary: Your Action Plan for Baking Chicken Breast
Baking chicken breast successfully requires understanding that timing depends on temperature, thickness, and starting condition. At 350°F, plan for 20 to 30 minutes for boneless pieces; at 400°F, reduce that to 15 to 25 minutes. Always verify doneness with a thermometer at 165°F, or pull at 160°F and let carryover cooking finish the job. Bone-in pieces need an extra 10 to 15 minutes, while frozen chicken requires approximately 50% more time. For more detailed temperature guidance, consult thermometer manufacturer guides that explain proper probe placement and reading interpretation.
Frequently Asked Questions
What if my chicken breast is thicker than 1 inch?
Thicker pieces need additional baking time regardless of oven temperature. Plan for an extra 5 to 10 minutes, or consider slicing horizontally to create two thinner cutlets that cook more evenly.
Can I bake chicken directly from frozen?
Yes, but expect roughly 50% longer cooking time. Always verify internal temperature reaches 165°F before consuming, and note that results may be less consistent than with thawed chicken.
How do I prevent baked chicken from drying out?
Use a thermometer to avoid overcooking, brine or marinate before baking, pat meat completely dry, and let it rest 5 minutes after removing from the oven. Higher temperatures (400-450°F) with shorter times often produce juicier results than low temperatures for extended periods.
Should I cover chicken breast while baking?
Covering creates steam, which can make the exterior mushy rather than developing proper browning. For the best texture, bake uncovered. If you must cover for the first half of cooking to ensure even heating, uncover for the final portion to allow the surface to brown.
Is 165°F the only safe temperature for chicken?
The USDA established 165°F as the minimum safe temperature. However, research shows that chicken held at 140°F for about 29 minutes also reaches safe consumption levels. The single-temperature standard of 165°F provides a simple reference point that works regardless of cooking method.
How long should I rest chicken after baking?
A resting period of 5 minutes allows juices to redistribute throughout the meat. Cutting too soon causes those juices to run out onto the cutting board, resulting in drier meat. Larger pieces may benefit from a slightly longer 7 to 10 minute rest.
What’s the difference between bone-in and boneless timing?
Bone-in pieces require approximately 10 to 15 minutes additional time at the same temperature. The bone conducts heat differently and insulates the surrounding meat, creating uneven cooking patterns. Measure temperature at least ½ inch from the bone for accuracy.
More related posts
 Linda McCartney: Biography, Death, Funeral, and Legacy
 Jaiden Animations: Diagnosis, Net Worth & Privacy
 How to Invest in Stocks – Beginner’s Step-by-Step Guide
 Anne Frank: Biography, Diary, and Death | Comprehensive Guide
 The Unwanted Undead Adventurer: Worth Watching? S2 Updates
 Seymour G. Epstein: Biography, Family, Death Explained
 Andrew Chang: CBC Anchor & About That Host – Biography
 Toronto Maple Leafs Salary Cap: Space, Contracts & 2026-27